01 / BEFORE YOU START
What you’ll need.
Hyperchat runs in infrastructure you own. You’ll need a computer for setup, access to a terminal, and accounts with the services below. The download includes SETUP.md and an installer that walks you through the backend configuration.
| Service | What it does | When you need it |
|---|---|---|
| Node.js & pnpm | Install and run the codebase | Node 22.13+ · pnpm 10.20 |
| Convex | Database, backend functions and scheduled work | Required; use your own project |
| Zernio | Connect social accounts and deliver supported social actions | Required for connected social features |
| OpenRouter | AI writing and supported media generation | Optional; bring your own API key |
| Resend | Verification, password reset and invitation emails | Set up a verified sender for account email |
| Web host & domain | Serve your Next.js app over HTTPS | When you’re ready to put it online |
Your codebase license and provider usage are separate. Check Zernio’s current pricing and your chosen AI model’s cost before using connected features. Better Auth is already included in the codebase; it does not need a separate API key.
02 / INSTALL
Start in a fresh folder.
- Download Hyperchat from your DevLaunch library and extract the archive into its own folder.
- Open that folder in your editor and open its terminal. Install Node.js 22.13 or newer and pnpm 10.20 if they are not already available.
- Run the commands below. Keep the included lockfile.
pnpm install --frozen-lockfile
pnpm run setup
pnpm dev
The setup assistant signs you into Convex, selects or creates your project, asks for your frontend URL and owner email, and accepts your Zernio key through a hidden prompt. For local development, use http://127.0.0.1:3215 as the frontend URL.
It generates the authentication and webhook secrets, deploys your backend, and creates .env.local and a private .bootstrap-owner file. Keep both out of shared folders and public repositories. Never copy another installation’s credentials.
Already installed? Open your existing project instead. Setup preserves generated secrets when rerun; changing those secrets is not a routine upgrade step. Follow the release’s included operations and update instructions.
03 / YOUR FIRST WORKSPACE
Create your owner account.
- Open
http://127.0.0.1:3215/workspaceand choose Owner setup. - Use the owner email you entered in setup, the token from
.bootstrap-owner, and a password of at least 12 characters. - If email verification is required for your installation, verify your email before signing in. New installs leave this requirement off until you test email delivery. Delete the bootstrap file after signup.
- Create a workspace named for your business or client. Open the workspace menu at the top right, then Workspace settings.
Use a separate workspace and Zernio profile for each client. Invite teammates through Team & approvals in the workspace menu. Regular signup is invitation-only; your clients should not use Owner setup.
04 / CONNECT YOUR SOCIAL ACCOUNTS
Connect Zernio.
Create your key and profile
In Zernio → API keys, create a key for this installation and copy it when shown. Create a profile for your brand or client. Profiles group that client’s social accounts. See the Zernio quickstart for the current dashboard flow.
Enter the key during pnpm run setup. If you skipped it, add ZERNIO_API_KEY in your Hyperchat deployment’s Convex dashboard → Settings → Environment Variables. It is a backend secret, never a NEXT_PUBLIC_ variable. Your key must have access to the profile you plan to use.
Assign, connect, then sync
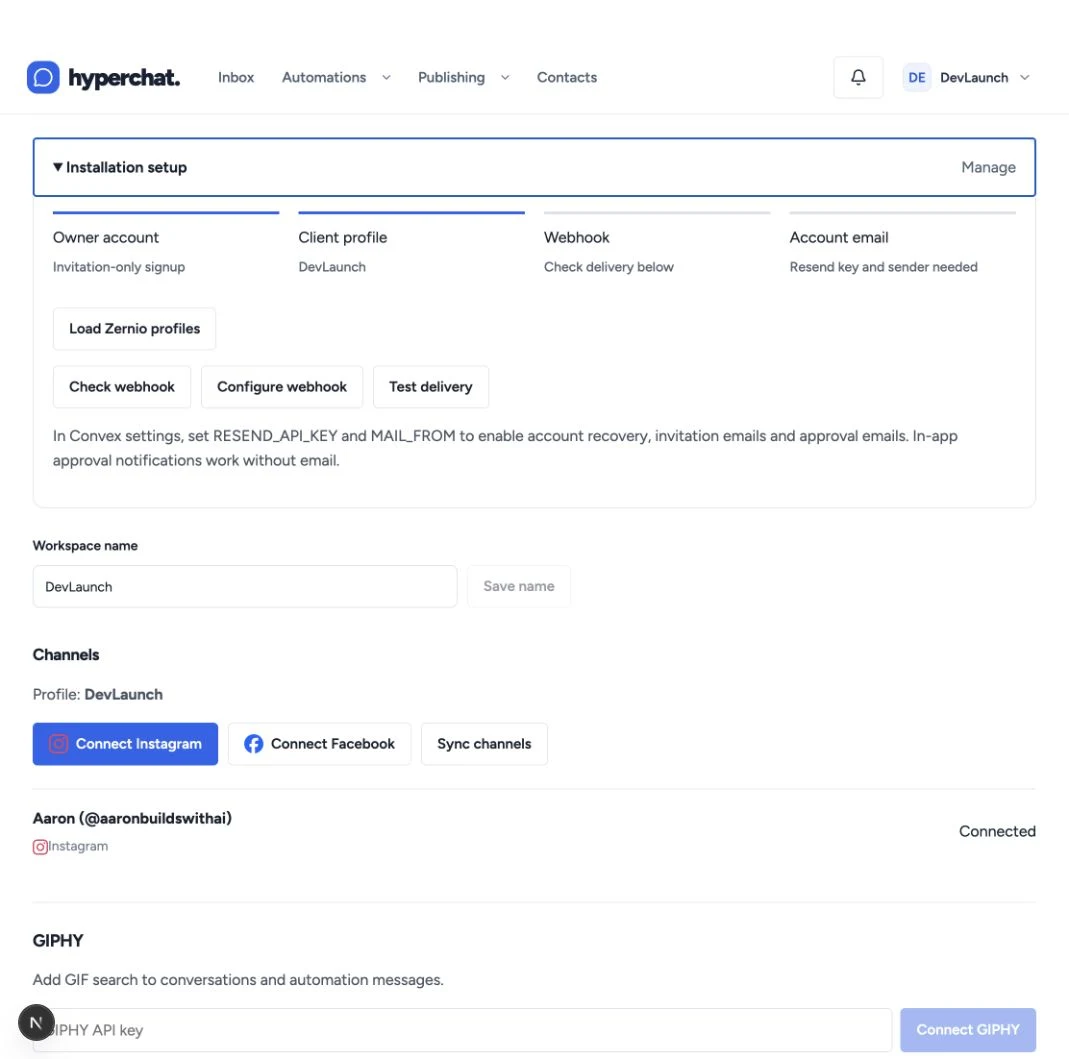
- In Workspace settings → Installation setup, select Load Zernio profiles.
- Choose the correct client profile and click Assign profile. Profile assignment is available to the installation operator.
- Under Channels, connect Instagram or Facebook and complete the provider’s authorization. Other publishing destinations are connected from Publishing.
- Click Sync channels or Sync accounts. Confirm the displayed account name and handle before continuing.
 View full size
 Turn on inbound delivery
In Installation setup, choose Configure webhook, then Check webhook and Test delivery. The webhook points to your public Convex URL ending in .convex.site/webhooks/zernio, so inbound events can reach your backend while your browser is closed.
The setup flow subscribes to incoming messages and comments for the assigned profile. For a multi-client installation, manage a multi-profile subscription in Zernio and include every assigned profile. After the delivery test passes, send a real test message from a second social account.
A connected publishing account does not guarantee inbox or advertising access. Each platform has its own supported formats, account requirements, messaging windows and permissions. Use Zernio’s platform guides for your channels.
05 / OPTIONAL AI TOOLS
Add your OpenRouter key.
Connect AI separately inside each workspace. You can use conversations, automations and publishing without enabling AI.
- Open OpenRouter → Keys and create a dedicated key. Add credits as needed for your chosen models and set a key spending limit. OpenRouter documents these key limits.
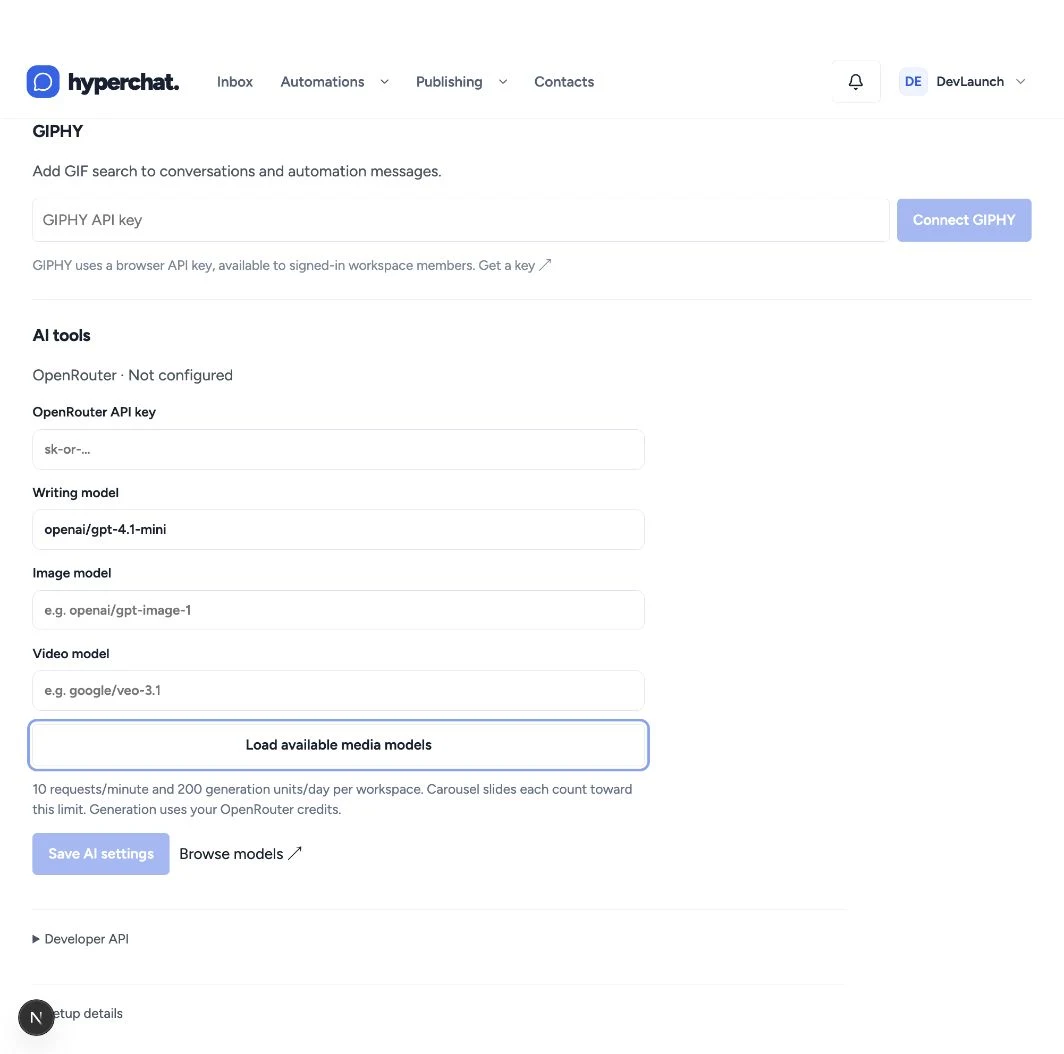
- In Hyperchat, go to Workspace settings → AI tools and paste the key into OpenRouter API key.
- Choose a Writing model using its exact model ID from the model catalog. The field’s default is a starting point; confirm current access and pricing.
- For images or video, select Load available media models and set the corresponding Image model and Video model. Leave unused media fields empty.
- Click Save AI settings. Open an AI writing tool in a draft, generate a short test, and review the result before using it.
 View full size
 The key stays on your backend. Generation sends the relevant draft, instructions and selected media to OpenRouter and its model provider. Review OpenRouter’s pricing and privacy settings for your use case.
Writing, image and video models are different. A text model can write a Reel script; it does not render a video. Media generation requires an eligible model and credits. Hyperchat’s generation limits are request controls, not a dollar spending cap. Review usage in OpenRouter.
Want GIFs too?
Add a GIPHY API key in Workspace settings → GIPHY. GIPHY search uses a browser key available to signed-in workspace members; it is separate from your private OpenRouter key.
06 / FIRST TEST
Start with one keyword.
- Open Automations and create a draft from a template. Select your connected sending account.
- Choose a DM keyword trigger and a distinctive test word, such as
HELLOTEST. Add a short reply. - Use Test flow to inspect the path. This simulation does not send a real message.
- Review and publish the workflow when you’re ready for it to reply to matching incoming messages.
- From a different social account, send a fresh DM containing the keyword. Check the conversation in Inbox and the execution under Automations → Run history.
For comment-to-DM, start with a selected test post. Don’t run both a Zernio-native comment automation and a Hyperchat workflow against the same comments. A private reply to a comment does not grant unlimited follow-up messaging; the recipient needs to reply before a separate DM flow can continue.
Then try a publishing draft
Open Publishing, compose a post, select the destination account and attach your media. Review the account-specific preview and timezone. Save a draft first; scheduling or publishing is a separate action.
Ad templates and research in version 1.5
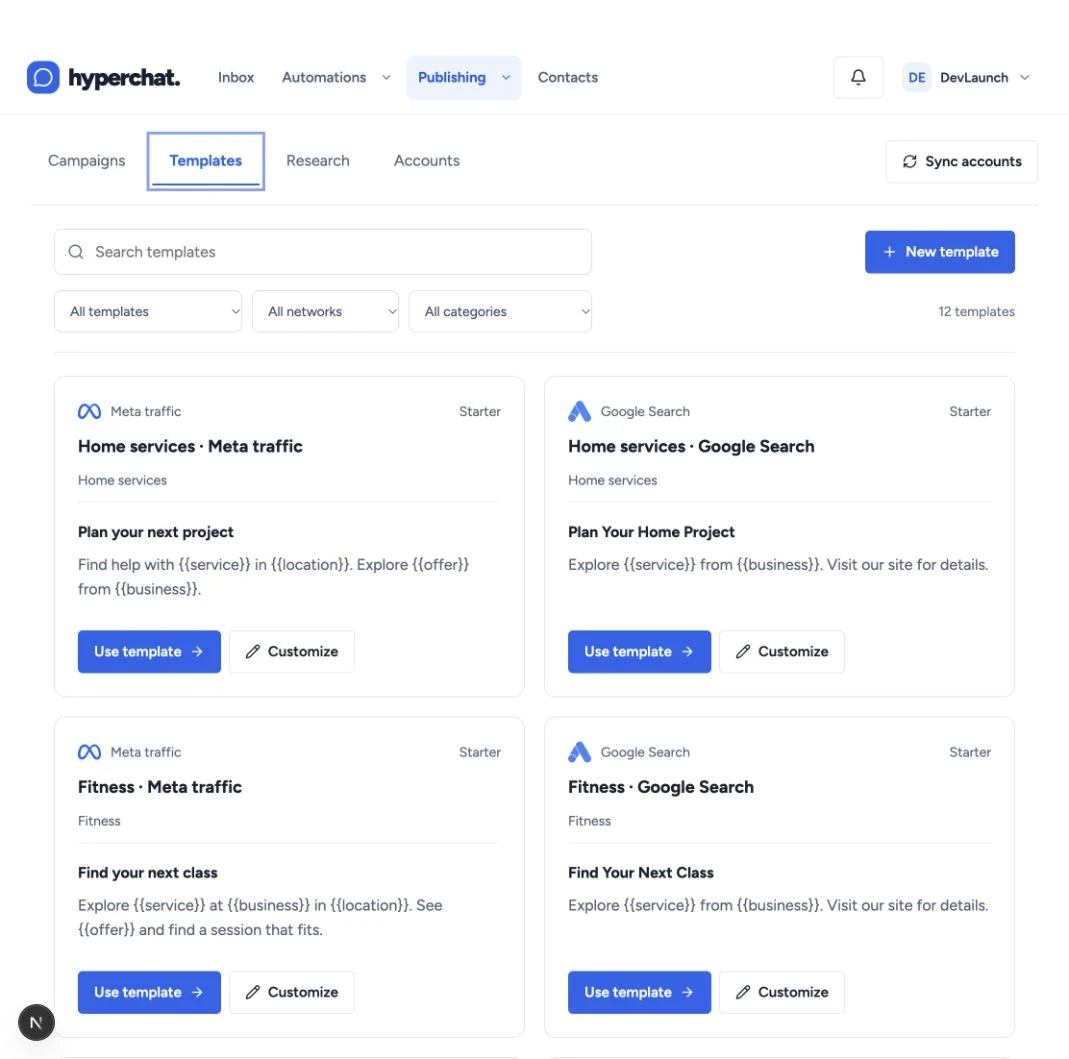
If your installed release includes the 1.5 tools, open Publishing → Ads. Templates can be customized for each client and saved as campaign drafts. Research includes Meta ad-library search and Google keyword ideas, plus saved boards and exports.
Meta’s commercial archive covers ads delivered in the EU or UK and requires a Zernio payment method; Zernio states the searches themselves are not charged. Google keyword ideas require an eligible connected Google Ads account. Competitor conversions and ROAS are not public research metrics. See Zernio’s ad-library guide.
 View full size
 07 / YOUR PUBLIC INSTALLATION
Deploy to your own domain.
Your local frontend is useful for setup and testing. To make Hyperchat available to your team, host the Next.js app on your own domain and use your own Convex production deployment.
- Prepare a separate production checkout of your codebase. Follow its
SETUP.mdand runpnpm run setup --prodwith your production Convex URL and HTTPS frontend origin. - Deploy Convex before the frontend. The production setup command deploys the backend; later backend updates use
pnpm exec convex deploy --yesfrom that configured project. - Set the frontend environment variables below on your host before building. Set Convex’s backend
SITE_URLto the same public frontend origin. - Deploy the app using a Next.js-compatible host. For a Node server, build with
pnpm build, then runpnpm start:production --port 3000behind HTTPS. - Create the production owner account, configure your production workspace/profile and webhook, and repeat the test workflow. Configure Resend and test sign-in, invitations and password recovery.
| Frontend variable | Value from your own installation |
|---|---|
NEXT_PUBLIC_CONVEX_URL | Your production .convex.cloud URL |
NEXT_PUBLIC_CONVEX_SITE_URL | Your matching .convex.site URL |
NEXT_PUBLIC_SITE_URL | Your HTTPS app origin |
These are public addresses, not API keys. Rebuild the frontend whenever they change. Keep Zernio, auth, email and webhook secrets in the backend environment; manage your OpenRouter key in workspace settings.
pnpm run doctor --connected
pnpm check
Doctor checks configuration and the test suite checks application behavior. Also verify actual delivery with your own connected accounts before running client campaigns.
08 / IF SOMETHING GETS STUCK
Check the connection that failed.
No profiles or connected accounts appear
Confirm ZERNIO_API_KEY is set in the Convex deployment your frontend uses. Check that the key can access the intended Zernio profile, assign it to the workspace, then sync. Only the installation operator can assign profiles; a workspace admin is not automatically the deployment operator.
The webhook test passed, but the automation didn’t reply
Check the workflow is published, its sending account matches, and the incoming DM contains the expected keyword. Use a different social account and a new message; imported history should not trigger a workflow. Inspect Run history, webhook event subscriptions and messaging eligibility. Human takeover or an opt-out may intentionally stop replies.
AI says the key, model or credits are unavailable
Check the key belongs to OpenRouter, its balance and spending limit, and the exact model ID. Check that you saved the setting in the correct workspace. Choose an eligible image/video model for media generation. A provider rate limit may require waiting; don’t repeatedly regenerate a job whose outcome is uncertain.
Owner signup or account email isn’t working
Use the exact configured owner email and token from .bootstrap-owner. Owner setup is for a new installation only. If email verification is enabled, check the Resend key, verified sender and delivery logs in your own deployment. See SETUP.md for operator recovery steps.
The hosted app connects to the wrong backend
Compare the three frontend URLs with your production Convex project and domain. Confirm backend SITE_URL matches the frontend origin, then rebuild. Development and production have separate credentials, data and owner setup.
Where do I find deeper technical documentation?
Your archive includes SETUP.md, docs/OPERATIONS.md, docs/CAPABILITIES.md, docs/RELEASE_NOTES.md and the API contract at docs/openapi.json. Use the documents shipped with your version when updating or customizing the app.
Upgrade to 1.5.3 without losing your customizations.
Version 1.5.3 includes Meta lead forms and CRM routing, separate ad approval chains, scheduled branded reports, an agency overview, bounded ad monitoring rules and Windows setup fixes. It also adds optional direct Meta setup and webhook diagnostics. Direct Meta Follow-to-DM sending remains inactive.
- Download version 1.5.3 from your library and extract it into a separate folder.
- Back up your current code, configuration and database. Keep an untouched copy of your previous release for comparison.
- Give your coding agent
UPGRADE_1.5.3.mdanddocs/AGENCY_OPERATIONS.md. Run the included read-only upgrade planner to identify upstream changes and customized files. - Merge by feature, preserving your schema, branding, integrations and dependencies. Test before deploying the backend, then the frontend.
Read UPGRADE_1.5.3.md in the new release. Compare my installed code with the untouched previous release and this update. Preserve my customizations, secrets and data. Prepare a feature-by-feature merge plan, resolve conflicts explicitly, and validate before deploying. Do not overwrite folders or run fresh-install setup over my installation.
Full upgrade guide for coding agents (Markdown) · Agency operations guide · Optional direct Meta setup guide · Reporting and export guide
The planner never copies, deletes or patches files. If the baseline is missing, it flags existing files for manual review. Previous downloads remain available for rollback.
Installing with a coding agent?
Your install folder includes START_HERE.md, the illustrated SETUP.md, and AGENT_SETUP.md with exact commands, expected results and recovery steps. The screenshots are included in docs/images/, so setup does not depend on this website.
Open the extracted folder in your coding tool and give it this prompt:
Read START_HERE.md and AGENT_SETUP.md, then help me install this version of Hyperchat using SETUP.md. Use my own Convex project, preserve the lockfile, and keep secrets out of chat. Confirm the selected project before configuration. Test owner setup and sign-in, and report which checks passed and which need my provider accounts.
Read the plain Markdown agent instructions · Full product handbook (Markdown)
If you have an older download without these files, read the guide alongside the setup instructions shipped with that version. Do not replace working credentials or run a fresh-install bootstrap over an active installation.
Workspaces and account connections
Start every task by checking the workspace and account name. Each client has separate contacts, media, templates, posts and access.
Set up a client
- Create or switch workspace from the top-right workspace menu. Use a recognizable business or client name.
- As the installation operator, open Workspace settings → Installation setup and assign the client’s Zernio profile.
- Connect the required accounts and sync. Check their names and handles before preparing content.
- Invite the client’s team through Team & approvals. Give client reviewers review access rather than administrator access.
Use a different profile/workspace for each client. A social publishing connection does not automatically include advertising, inbox or analytics permissions.
Find your tools
- Use Conversations for messages, Contacts for customer records, Automations for workflows, and Publishing for posts and advertising.
- Open Publishing’s navigation for Accounts, calendar/queue tools, Analytics, Approvals and Ads. Ads contains Campaigns, Templates and Research.
- Use the workspace menu for Settings, Team & approvals, and Help & feedback.
Labels and available controls depend on the installed version and your role. This handbook covers the 1.5 beta; consult the release notes in your download.
Manage conversations and customer records
Use the shared inbox for human replies, triage and customer context.
Organize and reply
- Open Conversations and select an account or folder: open, unread, mine, unassigned, flagged, closed or all.
- Select a conversation; claim it or assign an eligible teammate, flag important threads, add tags, and close resolved requests. Bulk actions help organize several conversations.
- Use the customer details panel for contact fields and private notes. A note is internal; it is not sent to the customer.
- Write a reply or choose a saved reply. Use the composer tools for emoji, images, GIFs and recorded audio where that channel supports them. Preview attachments before sending.
- Use human takeover when a teammate needs to handle an automated conversation. Check opt-out and messaging-window restrictions if Send is unavailable.
Rich messages differ by platform. GIPHY needs your workspace key; microphone recording needs browser permission and a secure context. A recorded audio attachment may not appear as a native voice bubble on every channel.
Create custom fields
- Open Contacts → Custom fields. Choose a clear key, label, type and optional group, description or placeholder.
- Choose from text, long text, number, currency, date, date/time, boolean, dropdown, multiple choice, email, phone or URL. Add choices when required.
- Preview the input and save. Set required-on-create only for information every new contact can supply.
- Open or add a contact; fill contact details, tags and grouped custom fields. Automation questions and API writes use the same definitions.
Existing field keys/types and choice values are protected to keep saved records valid. Create a new key for an incompatible change; archive obsolete definitions to preserve historical values. Importing a contact does not create a social conversation or permission to message them.
Build and troubleshoot automations
A template is an editable draft. It begins replying only after you select an eligible account and publish it.
Create a workflow
- Open Automations, choose a starter or create a workflow, and select Send from using the connected account’s name.
- Choose a supported trigger: keyword, exact/prefix match, first incoming message, fallback, Instagram story reply/mention, or button payload where available.
- Add messages, waits, questions, conditions, tags, custom-field updates, notes, flags/status changes or human handoff. Connect the intended forward paths.
- For a question, choose the field and answer type. Add a condition after the answer to route the conversation. Rich controls are also available in message steps.
- Use Test flow to inspect the route, review every link and branch, then Save draft or publish explicitly. Test flow does not send a real DM.
- Send a new matching DM from another social account. Check Conversations and Run history, including captured answers and delayed steps.
Workflows support up to 40 steps and forward branches, not arbitrary loops. Publishing records a version; editing the draft does not change the running version until republished.
Comment-to-DM
- Choose the Instagram/Facebook comment trigger and your connected sending account.
- Scope it to a selected test post or the intended supported posts, then set the keyword and one private text reply with your link.
- Disable any overlapping Zernio-native comment rule for those same comments.
- Publish after review and add a fresh matching comment from a different account. Inspect the delivery record.
The initial private reply is plain text, once per comment within the supported window. The recipient must reply before a separate DM conversation can continue. New-follower DMs and TikTok DM automation are not supported.
When a workflow does not run
- Confirm it is published and that the sending account, trigger, keyword and post scope match the new event.
- Check webhook subscriptions/delivery and then the run record. Historical/imported messages are not a fresh trigger.
- Check human takeover, opt-out, reply-window eligibility, missing field values and provider errors.
- Pause the workflow before editing a problematic live flow. For uncertain sends, inspect provider history before deciding what happened.
Do not automatically retry an ambiguous send: the customer might already have received it.
Compose, schedule and queue social posts
Create a draft first, then review each destination’s actual format and account requirements.
Compose a post
- Open Publishing and start a post. Select the intended connected accounts.
- Write the shared caption, then customize per-account text, media and options. Select the supported format for each account.
- Upload or select media, arrange its order, and check destination-specific previews and validation messages.
- Save the draft. If your workspace requires approval, request review of this saved revision.
- Choose a date, time and timezone to schedule, use an available queue slot, or explicitly confirm publishing now.
- Check the calendar, job status and provider result after dispatch. Refresh account status when a connection expires.
Scheduling is handled by the backend; closing your browser does not cancel a scheduled job. Required current approvals and account eligibility are checked again when it dispatches.
Carousels, Reels and video
- Choose a destination and supported post format before preparing media.
- For a carousel, add and order the individual slides/assets. Check the platform’s allowed media count and combinations.
- For a Reel or video post, supply an actual video file with the destination’s required dimensions, duration and encoding. A script alone is not a video.
- Review cover, caption and available channel-specific options, save, approve if needed, then schedule.
The app supports Zernio publishing adapters for X, Instagram, Facebook, LinkedIn, TikTok, YouTube, Pinterest, Reddit, Bluesky, Threads, Google Business Profile, Telegram, Snapchat, Discord, Slack and WhatsApp. This does not imply every format, inbox feature or analytics metric exists on every channel.
Queues and failed delivery
- Configure the account’s timezone and posting slots before adding approved content to its queue.
- Review the assigned slot in the calendar. Check destination-specific edits before changing a scheduled post.
- Read the exact job error if delivery fails. Reconnect expired accounts or correct validation failures before preparing a new attempt.
When delivery is uncertain, compare provider history first. Do not blindly duplicate or retry a potentially published post.
Create graphic templates and media
The 24 graphic presets use editable layouts and do not require an AI key.
Create reusable artwork
- Open Ads → Templates → Graphics and choose a layout: split, poster, offer, quote, event, checklist, product or editorial.
- Replace all example text, quotes, event dates and offers with your approved content. Set brand colors and optionally upload a photo and logo you have rights to use.
- Choose square (1080×1080), portrait (1080×1350), story (1080×1920), or landscape (1200×628). Shorten text that does not fit.
- Save design to keep an editable workspace copy. Download PNG for a local file, or Save PNG to media to reuse it in Hyperchat.
- In a post, use Media → Templates. In a Meta campaign, choose Create from graphic template or use the starter’s bundled artwork.
These are guided static layouts, not a freeform design canvas or video renderer. For a carousel, create/export each slide and order the resulting assets in the composer. Photos/logos accept PNG, JPEG or WebP up to 15 MB.
Use AI for creative work
- Add your OpenRouter key and eligible writing/media models in Settings → AI tools. Set your provider-side spending limit first.
- Choose the intended output: caption, script, image, carousel content or eligible video generation. Supply the business, offer, audience, format and constraints.
- Review generated claims and facts. Watch the job result; download or select completed media before attaching it to a draft.
- Check the destination preview and media validation before scheduling or using the result in an ad.
Model access, supported modalities, credits and pricing vary. Text models generate copy or scripts, not finished video. Paid media generation has not been certified across every model/platform.
Create and manage advertising campaigns
Advertising uses separate account permissions and provider capabilities. Start with a saved draft and a deliberately small approved test budget.
Connect advertising
- In Publishing’s account connection controls, connect the required advertising network through Zernio and complete its authorization.
- Confirm the advertising account, business identity, currency, billing and required network permissions. Sync the account into the correct client workspace.
- Open Ads → Campaigns, select the advertising connection and Refresh ads.
The guided template builder covers Meta traffic and Google Search. Other connected networks use the supported advanced campaign fields; available actions vary by network and Zernio access. A connected Instagram profile alone does not grant Meta ad-account access.
Build a Meta campaign from a template
- Open Ads → Templates → Campaigns. Choose a Meta starter from the 30 business categories and select Build campaign.
- In Client, replace the business, service, location and offer variables. Use truthful claims and a working destination URL.
- In Creative, edit the copy, headline and call to action. Customize the bundled artwork or select your own approved image.
- Choose Use this artwork to prepare the full-resolution image for the draft. If client details or the design change, prepare it again so the image matches the final copy.
- In Budget & account, select the intended advertising connection and required identity/account fields, review currency, enter the daily budget and countries, and complete all validation requirements.
- In Review, inspect the rendered creative, destination, budget and exact draft settings. Save the campaign draft.
Saving a draft does not create an ad on the network. The 30 Meta starters include editable artwork; they are original starter recipes, not ads with proven performance.
Build a Google Search campaign
- Choose a Google Search starter, fill the client variables and destination, and customize the headline/description fields and keywords supplied by the template.
- Select the connected Google Ads account, currency, daily budget and supported targeting settings. Resolve any account-specific validation requirements.
- Review the search-ad copy and exact draft settings, then save.
Google Search starters are text ads; they do not use Meta-style image creative. Google account eligibility and provider support determine which targeting and campaign settings are accepted.
Review, create paused, or launch
- Return to Campaigns → Campaign drafts & activity and open the saved draft.
- Review the connected account, creative media, destination URL, countries, daily/lifetime budget type, currency and exact campaign settings.
- For a paused test where supported, leave Launch active and allow the network to spend this budget unchecked. Confirm the settings and choose Create paused campaign.
- To deliberately spend, select the active-launch option, review again and confirm Launch campaign. The network may begin delivery and charging immediately.
- Inspect the job/provider result. Refresh ads and confirm the resulting campaign state on the network before further changes.
Pinterest and X require explicit active launch in the current adapter; there is no paused creation route for those adapters. Post approval chains do not approve ad spend. No advertising campaign was live-launched as part of the installation test.
Manage existing campaigns
- Select the correct advertising connection and Refresh ads. Open the campaign/ad you intend to change.
- Review its current state and supported budget/status controls before saving a change.
- Inspect Campaign drafts & activity and refresh to confirm the provider accepted the change.
Do not assume a submitted change took effect until its result is confirmed. Advanced campaign setup accepts network-supported options JSON; use the linked Zernio reference and the native Ads Manager for unsupported controls. Hyperchat does not replace every native Ads Manager feature.
Research ads and keywords
Research is inspiration and planning data. It does not reveal a competitor’s private revenue, conversions or ROAS.
Search and save research
- Open Ads → Research. Select the research tool, search terms and available country/date filters.
- For Meta, search the archive and inspect the returned advertiser, text and available source/creative information.
- For Google keyword ideas, select an eligible connected Google Ads account and enter the seed terms or supported inputs.
- Save useful results to a board with notes, then export CSV where offered. Use your own assets and claims when turning research into a campaign.
Zernio’s Meta commercial archive covers ads delivered in the EU/UK; it does not supply US-only commercial coverage. Billing eligibility may require a payment method. Image/video previews depend on usable media returned by the source; some results contain text or an original-ad link only. The extra US visual-research provider is not enabled in this release. Never describe missing media or metrics as available.
Teams, client reviews and approval chains
Invite only the people who need access to that client workspace.
Invite your team
- Open the workspace menu → Team & approvals. Enter the teammate’s email and choose owner-managed administrator, inbox agent or client reviewer access as appropriate.
- Create the invitation. Copy and privately share the link, or explicitly select invite email when your installation’s Resend sender works.
- The recipient signs in or creates an account using that email and accepts the invitation. Revoke unused invitations and remove access when a teammate leaves.
Links expire after seven days. Client reviewers only see requests assigned to them; they cannot see inboxes, contacts or credentials. Administrators cannot elevate someone else to administrator.
Set an approval chain
- Add up to five ordered stages under Team & approvals. For each, select reviewers and choose any one or every selected reviewer.
- Enable and save the policy. Save a post and choose Review post → Request approval; optionally add a deadline.
- Reviewers open Approvals, inspect the saved snapshot and approve the active stage or request changes with a note. Authors cannot approve their own requests.
- After all stages pass, an administrator reviews the publish time and schedules, queues or publishes.
Editing content, changing policy or removing a required reviewer invalidates the old approval. Dispatch checks approval again. These chains cover social posts, not advertising budgets.
Read analytics and export reports
Publishing → Analytics shows the metrics the connected provider can actually return.
Create a report
- Choose the workspace/account and a 1–90-day UTC range. Compare with the previous equal-length period if useful.
- Review impressions, engagements, reported reach, top posts, daily breakdowns, followers and historical posting-time suggestions.
- Export CSV or use the print-friendly report for client review. Check the retrieval timestamp and any unavailable values.
Reports use publish-date attribution: lifetime metrics for posts published in the range, not engagement received on each day. Summed post reach is not unique audience size. Missing metrics stay unavailable; follower growth needs at least two observations. Reports may be cached for five minutes. Workload counts such as open conversations and overdue approvals are separate from social metrics.
Developer API and CRM integrations
Use workspace-scoped keys for server-to-server integrations; keep them out of public browser code.
Connect your own system
- Open Settings → Developer API as an owner/administrator. Create a key with only the required scopes and an appropriate expiry; securely save it when shown.
- Use the base URL https://YOUR-CONVEX-DEPLOYMENT.convex.site/api/v1 and an Authorization: Bearer header. Read docs/openapi.json in your install folder for request/response schemas.
- Read contacts, fields, conversation metadata/messages or the event feed with cursor pagination. Create/update contacts and create fields with the required write scopes.
- Send a stable Idempotency-Key for writes. Use expectedRevision on contact updates; handle conflicts explicitly. Revoke keys when no longer needed.
API v1 does not expose outbound customer messaging or workflow publishing. Supported outbound events are contact.created, contact.updated and message.received. A developer must configure the authenticated webhook subscription, verify HMAC signatures and deduplicate event IDs; see docs/CRM_AND_API.md.
Seedly CRM
- Have your developer read docs/CRM_AND_API.md for the exact supported backend functions, scopes, mappings, sync and webhook setup.
- Use your own Seedly instance and sub-account with a scoped server-side key. Start with a controlled contact record and review field mappings/conflict behavior.
- Enable only the required contact, deal/pipeline or task operations after confirming the remote configuration.
The Seedly integration is backend-only; there is no finished connection form or deal-board UI. Its provider contracts are tested with fixtures, not a live customer Seedly deployment. Do not expect a one-click connected CRM on a fresh install.
Report bugs and follow fixes
Use the DevLaunch Build Board as the shared record for bugs, feature requests and release follow-up.
Submit a useful bug report
- Open the workspace menu → Help & feedback. Copy the report template; it includes your app version and current section.
- Open the Build Board link, choose Hyperchat and verify your email. Choose Report a bug.
- Use a specific title such as “Campaign draft loses country after reopening.” Include numbered steps, expected result, actual result/exact error, browser/OS, frequency, version and whether you customized the code.
- Add a redacted screenshot or recording as an HTTPS link in the evidence field. The board takes a link; it does not upload the file for you.
- Submit and follow the report. Keep follow-up details in the same thread and retest when the team marks a fix with its release version.
Bug reports are private to the reporter and DevLaunch team. Feature ideas may become public after review; supporting links and version details remain private. Never include API keys, bootstrap/invite tokens, environment files, full customer conversations or sensitive account data.
Collect safe diagnostics
- From the install folder, run node scripts/doctor.mjs --connected --json. Review its output before sharing.
- Attach the relevant exact error with secrets removed. Say which setup step failed and what you tried.
- For urgent login, workspace-isolation or duplicate-send problems, say so in the first line. Pause the affected automation/schedule if you can do so safely and preserve the run details.
Doctor reports configuration checks without values and does not upload anything. It cannot verify live credentials or message delivery. DevLaunch does not automatically receive the private logs in your buyer-owned backend.
What happens next
- The team reviews the report and may ask for a minimal example or additional redacted evidence.
- Track replies, status and release details on the board. One report per issue keeps the history useful.
- After updating, repeat your original reproduction steps and report whether the issue is resolved.
For a feature request, describe the task you are trying to finish, who needs it and a concrete example. Do not put a private bug’s customer details into a public feature idea.
Updates, backups and ongoing checks
Treat your source, database and provider configuration as a system you operate.
Apply an update
- Read the new release notes and compare the version in package.json. Keep a copy of your current source and record your customizations.
- Back up the relevant Convex data using its supported export/dashboard process. Store backups and deployment secrets privately, outside Git and public downloads.
- Test the update in a separate development checkout/deployment. Merge customizations deliberately and preserve the supplied lockfile.
- Run frozen dependency installation, doctor and pnpm check. Test owner sign-in and the workflows you actually use.
- Deploy the matching backend before the frontend. Confirm public frontend URLs match the intended backend and repeat a controlled live check.
Do not rerun first-owner bootstrap or rotate secrets as a routine upgrade. Database/schema changes can make rollback more complex than restoring old frontend code; check release-specific migration instructions before deployment.
Routine operator checklist
- Check failed/uncertain jobs, expiring connections, pending approvals and incoming bug reports.
- Monitor Convex, Zernio, email and OpenRouter usage and provider limits. Keep provider-side AI spend limits current.
- Review memberships, invitations, API scopes/expiry and retained customer data.
- Keep a known-good test account/workflow so reconnects and releases can be checked without using customer campaigns.
The buyer controls retention, backup policy and access. A successful unit test or build is not a guarantee of provider delivery or account eligibility.
Build branded reports and presentations
Publishing → Analytics groups advertising, social accounts and connections. Open Build report for the v1.5.1 designer.
Design and export
- Load the advertising connection, account and date range you want to report on. An Instagram publishing connection is separate from Meta Ads access.
- Choose a starting layout, reorder sections, select metrics and switch line, area, bar, donut or table visualizations. Filter currencies before comparing monetary totals.
- Add your logo, client, accent color, author and footer. Save a named layout; administrators can set a workspace default.
- Write your summary and recommendations. Optionally ask the AI tab for a draft using your configured OpenRouter key, then review it before applying.
- Download a PDF in A4, US Letter or 16:9, or export an offline HTML presentation deck. No AI key is required for design or export.
Keep source dates and partial-data warnings in reports. PDF text is image-rendered; the editable source remains in the builder. HTML decks are not PowerPoint files. Provider coverage, attribution and privacy limits apply.
Lead forms, approvals and agency operations
Version 1.5.2 adds the following workflows. New schedules, routing and rules require configuration; installing the update does not enable them.
Capture leads and route them to your CRM
- Open Ads → Leads → Forms. Import an existing Meta form or save a draft with questions, a privacy-policy URL and thank-you copy. Create on Meta is a separate provider action.
- Map provider answer keys to contact fields, choose tags and an assigned teammate, then enable routing. Configure lead retrieval permissions and the advertising webhook events in installation setup.
- Choose the ready form on a Meta lead-generation campaign. Review and approve the campaign before launch.
- Inspect incoming leads and fix mapping errors before Retry. Existing verified Seedly auto-push receives routed contact changes.
Lead intake does not grant DM or marketing permission. An unconfirmed form creation must be reconciled with Meta before retrying.
Review ad campaigns and updates
- In Team & approvals, configure separate advertising review stages, any/all reviewers and an optional currency-specific budget ceiling.
- Request review from the draft with the intended delivery mode. Reviewers approve the exact creative, targeting and budget.
- An administrator submits the approved settings. Draft changes, policy changes and revoked reviewer access require a fresh review.
Existing post approvals remain separate. Enabling a policy does not pause ads already running at the network.
Schedule branded reports
- Save a report layout in Analytics, then open Scheduled reports. Choose an advertising connection/account, weekly or monthly cadence, time zone and current workspace recipients.
- Configure Resend, a verified sender and a reachable HTTPS SITE_URL before enabling email delivery. Generate & notify recipients runs immediately, even if the recurring schedule is paused.
- Recipients sign in to open their report. Download a PDF or offline HTML deck from the saved report. Report history separates generation from mail-provider acceptance.
No AI key is needed. Weekly periods cover the last seven complete local dates; monthly periods cover the previous calendar month. Email sends a secure link, not a PDF attachment.
Monitor the agency and configure rules
- Analytics → Agency overview lists workspaces where you are an owner/admin, with approvals, leads, connection issues and the latest report selection for each client.
- Ads → Rules supports spend, cost per conversion and CTR conditions. Begin with alerts and choose a currency, reporting window, minimum spend and cooldown.
- Automatic pause or budget changes require explicit enablement and a target ad. Budget changes require a maximum and are limited to 25% of the current budget per action.
- If ad approval is enabled, matching rules create drafts for review. Pausing or editing a rule invalidates its queued changes.
Rules normally evaluate every 15 minutes. Partial/missing data or currency mismatch skips action. These are not real-time billing caps. The full agency-operations Markdown guide is linked in the upgrade section.
Send feedback that we can act on.
Open your workspace menu → Help & feedback to copy your version and a bug-report template. On the DevLaunch Build Board, choose Hyperchat, verify your email and select Report a bug or Request a feature.
Include the steps, expected result, actual result, browser, version and whether you changed the code. Add a redacted screenshot or recording link. Bug reports are private to you and the team; feature ideas may become public after review. Follow the report for updates in the board.
Your beta archive includes offline setup screenshots, docs/BETA_TESTING.md and docs/TROUBLESHOOTING.md. Installation diagnostics are available without sending anything automatically:
node scripts/doctor.mjs --connected --jsonReview the output before sharing it. Never send environment files, API keys, setup tokens or customer conversations.